Pages

Showing posts with label sewing room. Show all posts

Friday, 22 January 2016

Sewing Room Rebooted!

I spent the first half of January having a massive clear out of my sewing room and a move about of furniture around the house. This has resulted in me at last having room for a design wall!!


I have been looking forward to sharing photos of the finished room with you. How pretty does my sofa look? This is actually a sofa bed as this room doubles as our spare room. Luke Haynes and Karen Lewis have slept here!!
Not at the same time though!!!

You can see most of my new fabric storage in the photo above (and the one below actually), I have 4 trolleys that my hubby made me with stacked Ikea boxes on, they fit under the table or in nooks and crannies around the room.

I forgot to take 'before' photos but I have a few 'during' photos like this one above - the horror!

I filled 13 bin bags in total - most of it went to the Edinburgh Scrap Store to be redistributed, and the rest went to charity shops, or the actual bin.


I had a big bookcase/dresser type of thing on this wall where I used to store my fabric, except my stash had outgrown it (hence the new trollies). We had a move around in our bedroom and found a space for it there, and now my bedroom is vastly improved too!

Below is a 'during' photo of this end of the room - chaos! It took days to sort all this out.


The paintings around the room are all be my son Jacob Avery, and there are also embroideries and framed needlepoints that my mother made. I don't have many swap minis in here as they are all hanging in my studio. I store my rolled quilts at the back of the sofa.


I love my new Design Wall! 
I just stuck a load of orphan blocks on here to try it out. It is made with Gridded Flannel by Kaffe Fassett which is available to buy on our website and in our shop. Hubby just stapled it to the wall. 

The embroidery hoops to the far right were by my swap partners in the 'Hoop Up' swap one year. In fact there are quite a lot of items made by Dolores in this room!


Like the two sweet little dolls on my new Inspiration boards! Dee sent me these just a week or so ago. She made them 30 years ago!

The framed picture above the board is one of the Lowry needlepoints my late mother loved to make, this one is from a kit I made up specially for her. I really love having her handmade things all around me.


I am so happy with my bright spacious tidy room! I know where everything is, which is quite unusual for me! It is actually quite hard to get me to leave it and spend time in the rest of my house. And as I have been working from home since mid December (I am back to teaching tomorrow!) I have been in here rather a lot.

This week I have been working on more blocks for the Mystery Quilt evening course I mentioned in my last post.


This is a Snail's Trail block and all was going splendidly until I measured it at the end and found it was only twelve inches when it should have been twelve and a half! I couldn't understand what was going wrong as I had worked out the pattern using EQ7 and on graph paper.

And then, just when I was going to give up and decide on a new block I measured my seams and realised they were a tiny bit over a quarter of an inch! My usual machine is getting serviced and I am using a basic model from the studio with a quarter inch guide foot which has a 'wall'. I am not used to this and was obviously shoving my fabric too close too the wall, making my seams too big - total rookie mistake!!


So I had another go today adjusting my seams and this one is bang on - phew! My students love to hear about my mistakes (as they have a crazy idea that I only produce perfect sewing!) so I hope you do too!


You can see the difference between the blocks here. It's the sort of simple mistake I am always warning my students about and just goes to show you have to be so careful with your seams!!

I will be passing on this wisdom in the first class on Thursday. Just one place left still if you are interested!

Wednesday, 23 December 2015

Sewing Room Shelves Wall Hanging

There's just enough time before Christmas is upon us to share this project I made for the current issue of Popular Patchwork magazine.


If you are anything like me you will want to start the New Year with a big clear out and an organisation of your sewing room. If you're not like me then why not just make this very tidy Sewing Room Shelves Wall Hanging instead!


It even made the cover (in the sidebar!)! That beautiful rainbow cover quilt is by my pal Mandy Munroe.


This was such a fun project to make!

I totally stole that genius 'glass jar' idea from my friend Dolores, who is so talented and always has the best ideas! Here's the post where I first saw it.


They're made using clear vinyl and much to my husband's disgust they are sewn closed! He just couldn't understand how I could trap in all those safety pins and buttons! But I think it was worth it as I love the look.

Then there is a rainbow row of spools!


And two stash piles of yummy fabric! I used some hand quilting to highlight details.


The tape measure binding was the perfect finishing touch I think.


And here's a last close-up of the button jar. Thank you so much for letting me 'borrow' your amazing idea Dee!

Saturday, 11 July 2015

Using up my class samples (again)


This week I have been tidying my sewing room. A few weeks ago I hosted a giveaway and asked all you lovely, wise peeps to give me your fabric storage tips as an entry comment. I got some great ideas and the one I liked best was to store my fabric in a trolley that would live under my sewing tables.

So I got my husband to buy me some plastic boxes on a recent trip to Ikea and make me a trolley to stack them on (I know, I am very lucky!).

Here is a 'Before' photo to show you the fabric storage chaos I was dealing with... (some folks admitted to gasping when I shared this on Instagram!)


and here is the 'After' photo!
Of course I didn't have enough Ikea boxes for all the fabric, I'm going to get double the quantity to give me a little growing room ;), but it's looking a lot better. Those big boxes contain larger pieces and neutrals. And the First Aid box is full of threads (I'm not some health and safety freak in case you wondered!).


So while I was in the tidying zone I thought I'd have a rifle through my bag of class samples and see if I could 'use them up' as Odyssey would say (another one for the older reader there!).

But then I remembered that I had done quite a bit of this class sample recycling recently but hadn't shared any of it here! 

So first up is this workshop bag that I made from bits and pieces from my 'Scrappy Improv' workshop.


The whole thing was made from scraps, even the straps, and when I finished the pieces for the front and back I basted them with wadding and used them as practice pieces for the FMQ patterns I used on my Modern Medallion Quilt. AND the best bit is that this is now it's own class sample as I gave a workshop on how to make this handy bag (for carrying mat, ruler etc to workshops, see this post for more info) a few months ago and will again in the Autumn!
So I made the class samples into practice pieces and then made the whole thing into another class sample!
That kind of thing makes me very happy!!


The other class samples I have been using up recently are Flying Geese. Every time I teach students to make these I get 4 units. 8 untrimmed units are the perfect size to make these storage caddies!


This is one of the classes I will be teaching in Stockholm this October (at the Swedish Patchwork Association's AGM) and so I never miss an opportunity for a quick practice. They are also very useful containers around the sewing room, and make lovely gifts...


This Priory Square version was a wee thank you gift for our EMQG long-arm maestro Tatyana, after she helped me out with a commission quilt in June.

And that brings us on to this week and the bag of class samples. These are mostly from my Modern Sampler Quilt evening course which I have taught maybe 5 or 6 times now.  I try not to make new samples every time but some of the techniques need to be demonstrated, hence I had 6 fan blocks.


I thought these 4 looked good together and really couldn't resist sewing this up . And so my 'scrappy wheel' block was born! I added the Pam Kitty Morning border to make it big enough for an 18 inch pad. Somehow it has become a little distorted, with the centre circle more egg shaped. But I have decided it looks nice and quirky and just adjusted the border widths to sort it (I was too exhausted by all the tidying to care!).


And then I just had to hand quilt it! It was just crying out for a little perle cotton 8 love! This is still a WIP as I type.

So back to that bag. As well as MSQ class samples I found practice pieces for commission quilts like my Feathers Quilt and the reversible 'Village' table runner I made for 50 Fat quarter Makes and some orphan 'Bearpaw Squared' blocks that I had made for a 'design your own quilt block' class years ago (a class I am about to revive!). I spent a lovely morning planning out a quilt top (like doing a giant fabric puzzle!) and then just decided to go for it.


And here it is all put together (and being held up by one of my tall and helpful sons!). As well as a few 'filler' strips there are (still more!) Flying Geese, some HSTs and a piece of AMH's Lolouthi I have been hoarding for the right moment.


I absolutely love the way this had turned out. In fact I love it so much that I've decided not to finish it yet but to add more to it to make it a really big quilt, then to spend many hours hand quilting it with care. And when it's finished I am going to give it to a really special person - ME!

Yes I am going to make a quilt for myself! And this one will be very special, a sort of 'greatest hits of Jo' as it will have so many different blocks I have designed and will hold so many memories. Plus it's totally scrappy which is very 'me'!


So with this in mind I had another dig around at home and found a load more HST's and matching squares and put together this little block (still having a wonderful time as I love all this 'use it up' activity!).

Then today I worked in the shop and had a rummage around the studio and came up with all these goodies...


The original Feather prototype, some scrappy solids that I was going to turn into a needlebook and some EPP either already appliqued or ready to be appliqued!.

I am off to London tomorrow to stay with a friend and to give a talk at the Richmond and Kew Quilters (where I will meet Benta!), but as soon as I get back I know I will be right back on to this project, long term or not!

Saturday, 30 March 2013

Cover Star

I am very excited to share this news with you and I hope you don't all think I am bragging as I tell you about another magazine mention. Because this one is rather special. 
Not only is my Liberty Dresden Plate Cushion the big picture on the front cover, but can you also see that smiley blonde woman at the bottom? That's me, that is!!
I was really pleased just to get this cushion project in to Popular Patchwork, but then they also decided to do a whole 3 page spread on 'my creative space' as part of a series they are doing!
It is such a lovely article and I am chuffed to bits with it (thank you Jane Rae!). And as it finishes so my project begins over another 4 pages! I am feeling very spoiled by Popular Patchwork...
 I have also been desperate to show you the cushion which I made all the way back in December!
 I took quite a few photos of it before I had to send it off (so just indulge me here).
It is the 4th in a series of Dresden Plate cushions I have made in the last few months. This one is all in Liberty Lifestyle fabric, including a large portion from their new Stile collection (which I should have in stock in the shop any day now). I am planning to produce a kit of this design to go with the Notting Hill one I did a few weeks back (which has been really popular so far).
I designed a new embroidered centre for this project. It's a bit more intricate than the first one and includes motifs from a few of the Stile fabrics.
Though leaning slightly more towards traditional quilting, Popular Patchwork is definitely embracing more modern styles at the moment and has some really nice quilts in this edition. I especially love the Kantha inspired throw by Mandy Munroe and accompanying article all about Kanthas.
So if you'd like to get the inside info on my sewing room and methods, as well as the full pattern and tutorial for this cushion, then get yourself down to your local newsagents (or order online here) and grab a copy of May's Popular Patchwork!
Thank you for your patience with the bragging :)

Sunday, 6 January 2013

How I spent my Christmas Break...

 ... I spent it mainly sock knitting! Yes as predicted by many readers, the sock knitting was very addictive and once I started I wanted to get those socks finished!  And I guess I did need a bit of a rest... so despite all my quilt-making plans, I spent a lot of time on the sofa, in front of the telly, with the wood burning stove on, knitting my socks - bliss!
As you can see, I managed the heel on the first sock. It all worked with the pattern and it fits me and feels lovely, but there's something wrong with the heel. It doesn't quite look like the photos. I must have done something wrong with the knit 1, slip 1, bit. I can't work out what though! I will have to ask a grown-up. Anyway it's still a knitted sock, made by me!
I did manage to start a new embroidery too (first one in many months!). Here is a sneak peek. This is probably the most geeky thing I have ever made. I wonder if anyone reading this knows what this design actually depicts?
And I tidied my sewing room!
This was the state of my fabric storage after a few months of frantic activity and no time to tidy (well that's my excuse, in reality I am just very messy!).
And here is the result of a day's sorting and folding. I wonder how long it will stay like this?

I also played around with a new crochet/patchwork mash-up project I have had in mind for a bit. But the results aren't quite working out the way I imagined at the moment. I will keep trying and you might get to see something of this soon.
So lots of new 'starts' but no new 'finishes'. I think it's time for a Finish-a-Long!
she can quilt
This year I'm getting involved in the FAL. Leanne at She Can Quilt is hosting it and I am sponsoring a prize as well as taking part. It all starts on Jan 7th (tomorrow), so expect another post from me then *pant*. I'm packing the posts in at the moment because I go on holiday for a week on Jan 8th!

Meanwhile I did actually finish a Christmas break project...
 Yes the socks are all done and I LOVE them so much! They fit me perfectly!!
Expect a few more socks here in 2013!!

Friday, 18 May 2012

Blogger's Quilt Festival Spring 2012

I have taken part in all but the first of these fabulous on-line events. And the fact that I haven't finished any new quilts recently wasn't going to stop me taking part this time!
So I searched back through my old quilts to see if there was one that I had never posted about before. I ummed and ahhed, and tapped my fingers against my chin... and then I looked up and saw this quilt! It hangs in my sewing room and so I guess I have become a little blind to it. But it is a real 'story quilt', so settle down with a cuppa and a biscuit and listen to my quilty tale!
A long, long time ago, in what I like to call 'my first age of quilting' I came across a reverse applique technique called Mola. I used to be in a local quilt group back in my mid 20's. All the other lovely ladies were quite a bit older and I learnt a lot from them. I think somebody must have come along to a meeting with a book about it. It is very important in the culture of the Kuna Indians who live in the San Blas Islands off Panama, you can read more about this here
Anyway, I have always loved hand sewing and this technique appealed to me so I made a cushion cover. That's it, in the photo above, but without the fish. I was also very keen on embroidering shisha mirrors at the time (all that ethnic stuff was very 'in' during the 90's!), so I used these too.
The other ladies in my group were impressed and asked me to take a class. I think this was the first time I taught anything, and seeing as now I teach sewing all the time, it was probably quite a pivotal moment. I had bought a book about Mola which had some traditional patterns in it, including the cat above, which I made as a demo piece for the class.
I then began to teach Mola to some other local groups and made more demo pieces. This griffin was inspired by a tapestry/embroidery I had seen at Traquair House, a local stately home and the oldest inhabited house in Scotland.

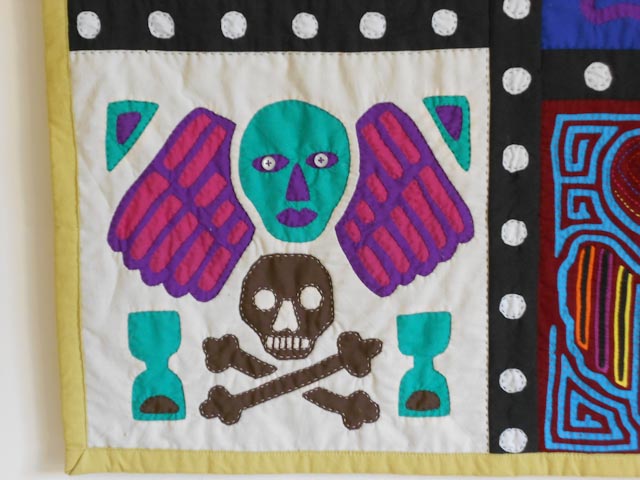
This next piece is a bit odd, and the only way I can explain it is to say that it was part of my '30's crisis! I started it a few months before I turned 30. I was feeling very depressed about getting old (ha! now I am heading for 46 this seems hilarious to me!). I had been visiting local graveyards and this design was carved onto a lot of old gravestones. I was really drawn to it's blunt honesty. No mucking around, just the truth - your bones are lying in the ground and your soul is floating upwards and the sands in the great timer of life are at the bottom.
I always choose my colours very instintively, and for this piece I chose very jarring, harsh colours (I think this is the only time I have ever used brown and jade green together!) which was obviously a reflection of how I was feeling at the time. I remember showing it to friends as I was working on it (I thought it was lovely) and they just gave me really funny looks! Once I turned 30 I felt great and totally embraced being a grown up (until I had my 40's crisis that is!).
This next piece has a sadder origin and is still hard for me to write about. A terrible tragedy happened in the town of Dunblane (about 50 miles from where I was living at the time) involving very young children. My sons were 4 and 6 at the time and it affected me very deeply, as I am sure it did everybody at the time. I really felt so distraught I didn't know what to do with myself. The only thing I could think of was to sew something and this design just grew in my head as I thought about what had happened. As I worked on it I felt calmer and more at peace. I felt that I was sending hope and love out in to the world with every stitch.
This piece was based on a design from a majolican plate I found in a book. I just loved the way the fish interlinked. But halfway through I put this aside and just stopped making Mola's.
And then a year or so later I went on holiday to Menorca, which is a beautiful Island that belongs to Spain. In a little, funky boutique in a back street of Ciudadela (the old capital) I found a pile of actual original Molas. I was totally spoiled for choice but I picked out 2 to buy (they were quite expensive, and rightly so).
As you can see, they put my work to shame, they are so intricate, and must have taken forever! Here is a close up, the beautiful rainbow coloured running stitch around the bird's head and the eyelashes were done by the original artist.
I loved owning these pieces of textile art from far across the atlantic but I didn't want to just keep them in a drawer. So I found all the old Mola's I had made and laid them all out with the original pieces I had bought. My son, Felix, was 10 at the time and had quite a big, bare wall in his bedroom. He liked the idea of a quilt made of all these colourful, graphic pictures to hang on his wall.
So I took apart the original cushion and added that strip of fishes. I finished the Majolican plate and added a sword (at Felix's request!). And then I just needed one more piece to make it all fit together.
A trip to The National Museum of Scotland brought me more inspiration. I loved this tribal mask and jotted down the design on a scrap of paper. I added a few more shisha mirrors for eyes, just to keep my hand in with the technique! The snake's eye is a shell.
Then I put it all together with black sashing and more reverse applique, revealing white circles beneath the black.
Instead of using wadding I used 2 or 3 layers of old cotton sheets as they do in parts of India. As there was still quite a few layers of fabric from the Mola technique the quilt has a very heavy feel.
I then hand quilted it VERY heavily, hopefully you can see this from the photo at the back. I just wouldn't have the patience to do that anymore!
It's a really unusual quilt and not something I would ever make now, but I love the history and stories inside it and the fact it holds these 2 original Mola's. As I speak, Felix is back in India, on his travels again. He has left the quilt with me, and I love having it hanging in my sewing room, but I kind of hope he asks for it back again one day.
Thanks so much for listening to my very long story! If you have more time to spare, head on back to Amy's Creative Side for more amazing quilty eye candy. Thanks so much for hosting again Amy!