Here is an early Christmas present for all my lovely readers - a tutorial for my Little House Pincushion! Complete with FREE patterns!
As you can see above, I made this latest little house pincushion as a Christmas Cottage, complete with a reindeer and snow! And not only is it a super cute pincushion, but it also has a hidden needlecase under the roof!
Right, let's get started. First of all gather your materials:
Fabric scraps (the biggest piece being 6" x 4")
Felt (largest piece 5" x 3" plus scraps)
Small piece of wadding/batting
Scraps of white fabric
Small piece of card
Rice
Stuffing
Buttons, beads and embroidery silks
Small piece of thin braid or ribbon (I used something called 'rats tails')
Matching threads and general haberdashery supplies.
I don't know how to do the whole pdf thing so I have photographed the pattern pieces above. As they are mostly straight forward squares this should work fine. The only tricky one is the house front but this pattern piece is just a triangle above a square, and I go into more detail about this below.
I like to use a different fabric for each side of the house, but you could make it all to match if you choose.
So cut all your fabric pieces:
Cut 3 x House sides and base - 3 1/2" x 3"
Cut 2 x Under roofs - 2 3/4" x 3"
Cut 1 x outer roof - 6" x 4"
Cut 2 x House sides (see below)
Out of wadding cut 1 x inner roof - 5" x 3"
Out of felt cut 1 x inner roof - 5" x 3"
For the house fronts cut 2 large rectangles 5 3/8" x 3 1/2". Then make a mark on the fabric with a pencil half way along the shorter side of the rectangle. Then make another mark 3 1/4" from one of the opposite corners along the long edge.
Line up your ruler along these 2 marks and slice off a corner. Repeat for the other corner. If you're wondering what is going on with my hands in these photos, the top photo was of my (briefly) assistant, Felix's hands (before he got fed up with me bossing him and quit! Yes, he is back safe and sound, more in a later post).
Here are my 2 house fronts.
And here are all the pieces cut and ready to go (minus the wadding).
Now it is time to assemble your house. The important thing to remember here is to start all your seams 1/4" from the edge of the fabric, and finish them leaving a 1/4" to spare.
Use a 1/4" seam as usual but leave a 1/4" of an inch of fabric at the top before you start sewing and at the bottom when you finish (I hope that is clear!). First put together your 2 house fronts and 2 house sides as below.
Turn right side out and press seams along corners of 'walls'.
Turn wrong side out again and sew the base to the bottom of the 4 walls (now you will see why you needed to leave that 1/4" space!).
You are basically making a little fabric box.
Still with wrong sides out, sew your inner roof pieces on, one at a time. Firstly sew the long edge of the under roof rectangle to the top wall of the house sides.
Then sew the under roof rectangle short edges to the triangular edges of the house fronts.
Repeat with the other under roof piece BUT leave the centre gap between the roof pieces OPEN for stuffing.
Turn right side out and press 'wall' and 'roof' seams as before.
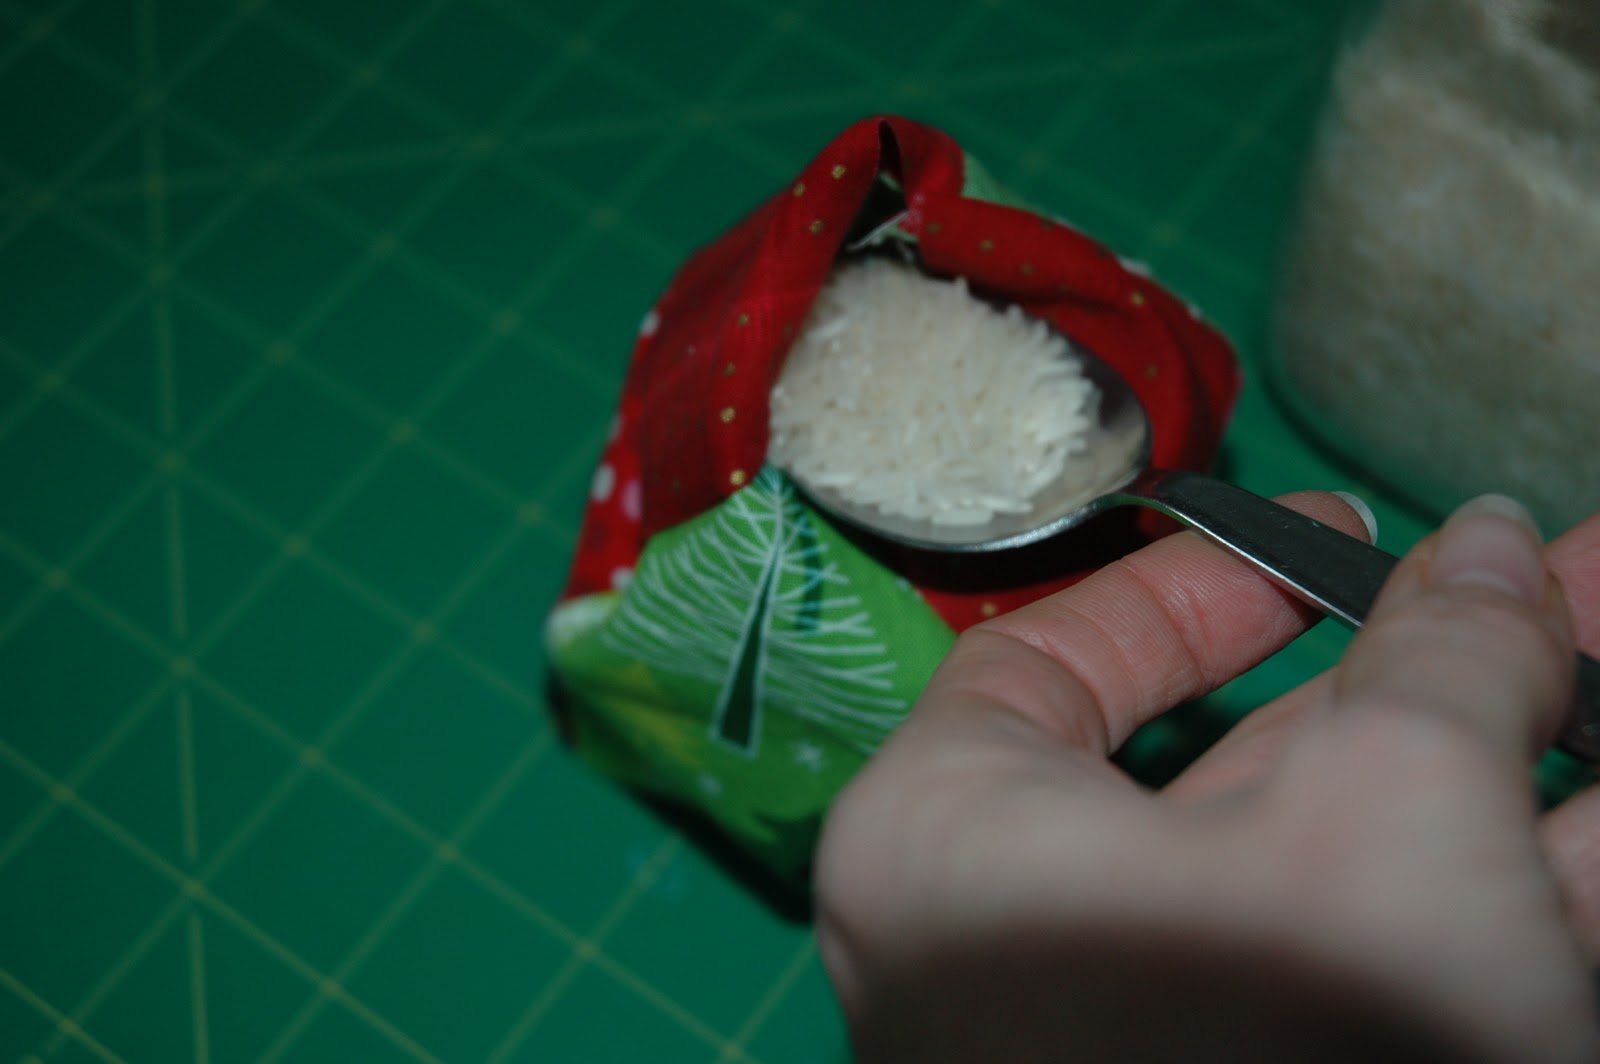
Now it is time to stuff. Get your rice, a spoon and stuffing ready, and cut a piece of card as below.
Pop the card into the bottom of the house, to give it some stability. I try and get it to go under all the seams (so it is smooth on the bottom from the outside). Next start spooning rice into the pincushion.
I like about an inch of rice on the bottom (about 8-9 spoonfuls), this gives it a nice weight.
Then start stuffing! Stuff it pretty firmly, but don't let the seams 'bulge'.
Once you are happy with your stuffing, pin and hand sew the roof top shut with matching thread (this seam will be hidden by the outer roof so don't worry too much about your stitches).
Now it is time to make the roof.
Lay your wadding piece on top of your fabric outer roof piece and press the edges over to enclose the wadding.
Lay the felt inner roof piece on top of the wadding and pin to the fabric.
Machine this all the way around, close to the edge, with matching thread. Fold the roof in half and machine along the seam, to make it fold in the middle more easily.
Now at this point you could make the simple pincushion, but if you wanted to make the pincushion with the hidden needle case under the roof then DON'T sew all the way around the roof, but leave a space on one of the short sides and slip in a little loop of braid into the seam and sew this down (reversing a few times to make it really stable).
If you are wanting to make the needlecase version, then hand sew a small piece of felt to one side of the under roof, as below. You could (if you were clever than me and had thought this through) machine this felt to your under roof piece before you attach it to the house. But it is only a small amount of hand sewing to do it afterwards.
At this point, on my previous pincushion houses, I have quilted the roof all over with a neutral quilting thread (see photos at bottom of page). But because I have 'snowy' plans for this roof I am going to leave it unquilted.
So now attach your roof to the under roof. If you are making the needle case version then you will be attaching just one side (the side without loop to the under roof without the felt).
I like to start with the centre roof seam to position correctly. Make sure the roof overlaps equally each side and pin and hand sew with matching thread, as below. Sew through just the felt and wadding, not the fabric, so you can't see your stitches from the right side.
Sew all the way around. The photo below shows me sewing the roof's short edge to the house sides.
If you want to make the 'simple' house version you will need to sew your roof down all the way around. The photo below shows the needlecase roof flap 'open'.
Now it is time for the chimney. These pieces are really small, but don't worry too much if you have trouble cutting things accurately, because the chimney is hand sewn it will be very forgiving of slight inaccuracies. Cut your pieces from felt scraps. I have cut mine and layed them on the paper next to the pattern below.
Using matching thread and a simple 'over stitch', assemble your chimney by sewing the chimney sides, front and backs (just as you did with your house), then sew the chimney top around 2 of it's sides, leaving 2 open for stuffing.
Position and hand sew the chimney to the roof. This is a bit fiddly and I don't seem to have any photos of the actually sewing bit - sorry!
Then stuff it from the top and sew the last 2 sides down.
You can also sew all the sides of the chimney top down and stuff it before sewing it to the roof, but I find the chimney ends up too fat and rounded that way.
For the needle case version you need to sew a button to the side of the house to hold your roof down. Position with your loop and mark with a pin before sewing.
Now we have the house structure firmly in place, it is time to make the windows and doors and embellish as you wish. I haven't given patterns for the windows and doors. The house is pretty small so just cut squares and rectangle to fit. If they are too big, trim them to size.
I use felt for all the doors and windows. Try to choose a contrasting colour to your house front fabrics. Here is a little square of felt that I am going to make into a window. Fold the felt in half first.
Then fold again so your felt edge just overlaps your centre fold.
Then start cutting 4 really small openings in the felt (use small sharp scissors). These will become your window panes.
Once you can get your scissors in to the felt carefully cut 4 small squares out, leaving enough felt in between to sew down. If this is just too fiddly for you, then just make one big pane and embroider a cross in the middle of the window.
Next cut a small piece of white fabric, just slightly smaller than your window, and pin this behind the felt window and on to your house.
Hand sew around using matching thread, catching the white fabric down as you go. That first window was a bit wonky so I put it on the back of the house!
Instead of just using white fabric behind the window panes, you can fussy cut some little creatures from fabric and trap them in the house! Here is a little Alexander Henry owl peeping out. For smaller windows with interesting things behind them I just use one big pane of felt.
Here is the first pincushion house I made for the
Scrappy Pincushion Swap. I made an opening door for this one with a tiny needlecase behind.
But for the Christmas Cottage I am just making a fixed, solid, felt door, as above.
A button makes a nice door knocker. And who else lives in the Christmas Cottage? Why, Rudolph of course! I don't know how he got up the stairs though.
Now all that's left to do is some nice embroidery. I usually embroider trailing flowers around the walls of the house, but seeing as this is a Christmas Cottage, I thought I would just add some snow instead (as all the flowers would be dead in winter anyway - am I taking the realism too far?). I cut out some meandering 'snowy' shapes in felt and sewed these to the bottom of the roof and made lots of french knots in white embroidery silks all over the roof top for falling snow.
And do you like the tiny garland on the door? I sewed a ring of backstitch in green silk, and then attached tiny seed beads over the top.
Here is the first pincushion again, so you can see the sort of 'summer' effect you can achieve with just back stitching and french knots.
And here is the second one I made
(the hand sewn version). I embroidered crosses on the windows at the front on this one, and added a window on the side and one in the door (with a babushka behind!). But I forgot to put a door knob on!
Lynne from Lily's Quilts made a very funny note on this photo on Flickr: the dolly is saying, "help, help I can't get out, somebody has sewn the door shut!"
That did make me laugh!
Now I think the Christmas Cottage is finished!
This is going to be another Christmas present, though, as before, it is hard to part with something so cute!
I do hope you enjoyed this tutorial and have found it useful. I would love to see any little house pincushions you manage to make.
I am very happy for you to use these patterns and instructions to make lots of nice pincushions for swaps and gifts, but please, don't use them for commercial purposes. And please always give me a credit and a link back to this blog page if possible.
Happy Christmas!


Absolutely wonderful! When I first saw your swap pincushion I so wanted to make one for my niece ... and now I can! Thank you so much for such a brill tutorial - and Merry Mitmas!
ReplyDeleteAwesome...I will save this in my tutorial file and give it a go next year. Pincushions are always such a lovely gift and one shaped like a wee house is bonus!:)
ReplyDeleteOur Maria is snugglie warm over at Marg's place...they are getting snowed in!!;) So nice she is able to get some homemade Christmas cheer since this is the first time in her life she is not home the week before Christmas!
BTW...I think you just scan your pattern and save it as a PDF file.
This is just adorable Jo. Love the snowy roof! This is going in my favourites file for sure! Thanks for going to all this trouble of doing a tutorial for us.
ReplyDeleteWonderful, Thanks so much for doing all this and at such a busy time. I'm looking forward to having a go.
ReplyDeletejust delightful, Thankyou!
ReplyDeleteOh Jo thank you thank you thank you - have I told you lately that I LOVE this pincushion .. .. .. now to find time to make one !! !! !!
ReplyDeleteFantastic tutorial. I am so impressed. The house is absolutely adorable!
ReplyDeleteLove the Christmas houses!.. Love the summer ones too!! Thank you for sharing a tutorial! I can't wait to try them sometime! ~tina
ReplyDeletesimply cute and adorable loved it mhuaa.from mehek
ReplyDeleteJo, what a fabulous tutorial! Now can you teach me how to sew straight? Hee hee.
ReplyDeleteHope you are keeping warm and cosy.
x
This is a great tute, Jo! Thanks so much for all the hard work, I hope you and Felix are OK again! lol
ReplyDeleteI love your little winter house and no, you didn't take the realism too far with the snowy roof- that just MAKES it! It's such a pretty winter house and the red, pink and green just screamed for more white, it's perfect.
Love the wreath on the door- anything sparkly suits me just fine. I'll be making a few of these for sure. Thanks again, such an adorable house!
Oh, if you can't find rat tail cording, a covered hair elastic would probably work, too.
Sooz/FlossieBlossoms
What a great tutorial! I found my way to your lovely blog via Flickr's pincushion swap. Thanks for sharing!
ReplyDeleteSo incredibly cute, thank you for the tut, have to make one of these!
ReplyDeleteWhat a neat tutorial! It is such a cute pattern!
ReplyDeleteMicki
Yay! I made one for my niece and she LOVED it! (She's 27!) It was super easy to make, the tutorial was PERFECT! I didn't use the loop and button, I just pinned the roof shut with a long pin, for quick access (and quick finish, truth be told!) pics here:
ReplyDeletehttp://www.flickr.com/photos/inkyswot/sets/72157625698013524/
Hello
ReplyDeleteYour blog is just beautiful!!
I loved the step-by-step house switcher. Just got to make the mold.
Even more
by Penov
Seriously cute!
ReplyDeleteThis is so cute I wanted to squeal! Thank you so much for the wonderful tutorial. I definitely will be making at least one of these (for myself!)
ReplyDeleteLeslie S. in MN
esclante at comcast dot net
Thank you so much for this great tutorial!
ReplyDeleteI just love houses (have collected miniature ones for decades)and this is such a beautiful house to make! Have been sewing for decades too, but have never seen such a beautiful pincushion in the form of a house before...
Thank you for placing this on your blog!
(I found a link at Dotty's blog)
This is one of the very cutest pincushions I've ever seen! Thank you for showing us how it is done.
ReplyDeleteI found your blog looking for a pin cushion pattern.... I LOVE YOUR HOUSE!!!! It is just too cute. I was looking to make a gift for a friend and this is perfect. Thank you sew much for taking the time to share!
ReplyDeleteThat is just the cutest thing! Thank you so much. I have to make one for me, and maybe one for a friend, too. Great job of explaining and pictures. If you have Preview, Image Tricks, Irfanview, PhotoPlus, Photoshop, or some other picture viewer, I think they all do save as and have .pdf as an option. Some of those, such as PhotoPlus, have a free version which will do it, too. Since you are on Blogger, you can go to google sites and set up a file cabinet (that's the template that's easiest for this) and put your .pdf files there so people can view them or download them. You can see mine here to see what I'm talking about:
ReplyDeleteWhat a lovely and original little pincushion. Thank you so much for the tutorial, I really love it.
ReplyDeleteVery nice! I love it!
ReplyDeleteits soooo cute!
ReplyDeleteThis is an adorable pincushion. Thank you for the wonderful tutorial. I love this so much that I had to blog about it today. Linda
ReplyDeleteThis project is absolutely adorable. One prettier than the other. Your tutorial is great. Thanks for sharing.
ReplyDeleteThis is very, very cute. I understand your not wanting this used for commerical use. Does this mean that I cannot make them and sell them at our quilt guild boutique - it certainly would not be for my profit - it would benefit the guild. Most of the proceeds from the guild are either used for promoting quilting, furthering education (which we open to the public, if not filled by guild members) and non-members may attend guild meetings for a nominal fee (our dues are only $25/year US), or I think buying needed supplies for charity quilts. Last year our members made, quilted, and donated over 300 charity quilts - mostly to needy infants. Thank you for the excellent tutorial. I've never made anything for the boutique and want to change that - I thought maybe pincushions would be a good seller at a quilt show. If you have an issue with that - I certainly understand and may just make one for a good friend - I like it that much.
ReplyDelete