Pages

Showing posts with label gifts. Show all posts

Sunday, 5 July 2015

Turning Japanese...

 ... oh yes I'm turning Japanese, I really think so!

Those of you of a certain age may remember this song by the Vapors. And it comes into my head as I consider my growing obsession with all things Japanese. Well as long as it's sewing related that is!


It started about 5 years ago when my husband bought me a book called Kokoro No Te 'handmade treasures from the heart'. I made a few items from it including this 'Tomato Cache' which I just dug out of a drawer for this post (seems a shame to stick it back in the drawer, maybe I should give it away to someone, or maybe to you lot?!!).


I went on to give a 'Fabric Origami' class at the first Stitch Gathering which included lots of embellishment techniques I'd learnt from the book.

And then there's the Sashiko. I bought my first Sashiko panel 2 or 3 years ago. Here is the latest one.


I love taking these panels on journeys as they are so portable and quick to do. I finished this on my recent trip to teach at Simply Solids in Huddersfield.

I now have 4 finished panels, and still the vague woolly idea that these will one day be turned into a quilt for my youngest son.


Meanwhile I now have a real life Japanese friend, Hikaru who has been helping me teach Sashiko at the studio. Hikaru has made this class extra fascinating by telling us all about the origins of Sashiko, the meanings of the patterns and showing her vast array of Sashiko samples.

And at this year's Stitch Gathering Hikaru will be teaching some workshops alongside me. Our 4 afternoon sessions have a combined Japanese theme so I think we will keep our classes close together.


I will be teaching Sashiko and also Origami Bags. I started making these earlier this year after my EMQG friend Tatyana showed our whole guild how to make the drawstring version above. I've just finished this one made out of lovely Dashwood fabric line 'Fly Away'.This is my fifth bag - they are such a fab easy gift!

But of course Hikaru knows lots of different ways to make Origami Bag and showed me how to make this 'water lily' version (I just gave it that name BTW, it probably has a different Japanese name).

Hikaru made the top one for a sample, then she made me the one on the left (with the beautiful hand stitching) as a birthday present, and I just made the last one to finally try it out for myself (seeing as I will be teaching it!) and as a birthday present for my son's girlfriend. We will be teaching both versions in the SG class.


Hiakru will also be teaching Clamshell Purses and Macaroon Pouches, both are proving very popular classes!


I first met Hikaru when she came to our shop a few years ago to buy fabric. She bought a lot of fabric and was very excited to have found us! Later she brought in some of these clamshell pouches to show us what she had used the fabric for. She had made over 70 of these for wedding favours! All hand stitched!

I tried one of these out a few days ago. I have finally caught up with all my magazine commission work (for now!) so I am relaxing with some 'frippery' crafting for the next few days!


I am thrilled with how this turned out (though I must admit that Hikaru prepared a little kit for me and basted the shapes - sshhhh!), and how well does it match my nail polish?!


And how totally adorable are these Clamshell Pouches? No wonder everyone wants to do this class at the Stitch Gathering!  Hikaru made both of these, I have yet to give this one a try.


Apart from being an exceptionally talented sewer/crocheter/knitter Hikaru is also a lovely kind pal who also made me this beautiful Sashiko pincushion for my birthday last month.


Did you know this shape is called a Biscornu? I have been calling is a doughnut but it actually has a proper name (though a very odd one!).


The other thing that Hikaru likes to make for everyone are these Japanese Thimbles. They should sit between the 2 joints on your finger. I had a very swollen finger earlier this year when Hikaru first made me the bottom one. Now my finger is much better so she gave me a new one (though it was hot when I took this photo so my fingers were a bit more swollen than usual - it should sit a bit lower down!).

I am hoping to learn to make my own Japanese Thimbles soon too, they are so pretty and delicate, which just about sums up everything I like about Japanese sewing.


I decided to add these little felt and bead 'cherries' to the ribbon end. These are something I learnt from the Kokoro No Te book, I used to make loads of them and add them as embellishments to the 'leaf needlecases' I used to make and sell in our old shop. I saw that Hikaru had made little fabric cherries for the ribbon ends on the bag she made me and (constantly inspired by her) I thought I would add some here too, they make a lovely finishing touch.

This photo was taken in our (almost finished) Japanese Zen Garden that my husband has been working on for the last year! Photo of the whole garden to follow soon.

See I told you I was turning Japanese! And it's catching!

Tuesday, 26 June 2012

Liberty Pandas and the Robot

I think that has to be the weirdest post title this blog has ever had! It sounds like a new show on CBeebies!
Let me explain...
As I was saying in my last post, I have been planning lots of new classes for the Summer and Autumn, and one of them is called Handmade Party Bags.
I do a bit of market research at each class, asking my students for ideas for other classes they would like me to offer, and a few young mums had wanted ideas for handmade party bag favours. They were all fed up with the cheap plastic tat you usually get and wanted to make something worthwhile to give away at their children's parties.
So meet my Liberty Pandas. This one is Sunshine, and the other is Sweetie. Obviously I have named them after the pandas at Edinburgh Zoo, which I still haven't seen! My pandas are wearing very luxurious Liberty pants. Sunshine's are made from Tana Lawn...
...and Sweetie's are made from gorgeous silk that I got as a freebie at FQ London. Unfortunately their pants are securely sewn on, so like their Zoo counterparts, they may have trouble conceiving!

I really do adore pandas (even more than owls actually), and these 2 are just so cute I can't stop looking at them! They are based on the felt animals I made for the mobile here, but with that little bit of extra detail and a hanging ribbon. They will be the girl present in the party bag (though I am reluctant to be so gender specific, I am sure lots of boys would like a cute panda with Liberty pants!).

Would you like a tutorial for the pandas?! I am on holiday next week (staycationing) and might just get one done!
And next, for the boys, meet Robot. He is more 3-dimensional than the pandas and stands on sturdy button feet. I had such fun making him! His 'controls' are press studs, buttons, beads, eyelets and a shisha mirror.
I've photographed him here in his usual hi-tech environment (a roll of aluminium foil). I got lots of ideas for him from a wonderful book called Crobots by Nelly Pailloux, which is all about crocheted robots. I plan to make a few more varieties before the class, but this one will do for the photo.
Robot doesn't have a name yet, does anything spring to mind?!
The class also features a very simple fabric party bag to put them in, but since I made this I have thought of a better way to do it so this will probably improve before the class.
The class is on Sunday 12th August and at the moment we have an Early Bird Offer on class bookings, 15% off all bookings made before Friday!! I know most of you live too far away but Edinburgh is a great place to come for a holiday, especially during August when the Festival is on! Check out my Summer School Classes here.

Oh and thanks for all the ideas for my next patchwork eve class, I think I have it all sorted now!

Wednesday, 11 April 2012

More Woodland Friends

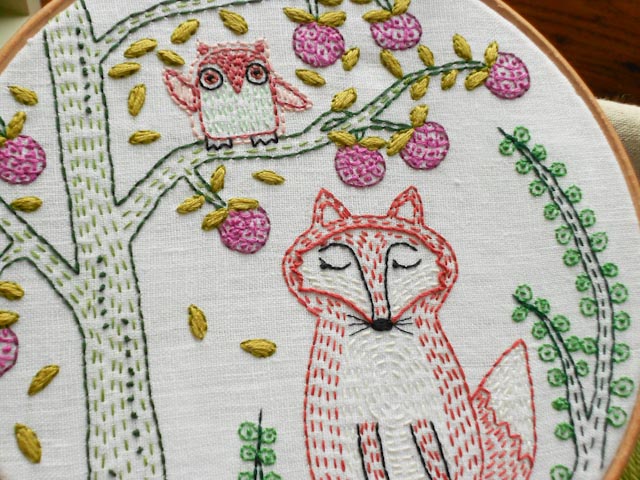
Meet Rufus the fox and the excitable owl. 
A few weeks back I completed this embroidery featuring Boris the bear and his chicken as an inspiration piece for the Hoop up - Stitch & Send swap. I really loved making it and went on quite a bit about how much I was enjoying embroidery.
My lovely assistant, Sarah, had a very special birthday last week and as she had been particularly keen on Boris this seemed the perfect excuse to have another go at a woodland themed embroidery. 
Sarah has a bit of a phobia about birds, so no chickens this time, but she doesn't mind owls, so there's one sitting in a tree behind Rufus. Actually I think he is jumping up and down on the branch, trying to get Rufus's attention and shaking all the leaves off the tree in his excitement! Hopefully he won't displace one of those big pink fruits - they look like they would give Rufus a nasty bang on the head if they hit him! 
Here is Sarah earlier today looking very happy with her pressie. Sarah has been working for me for 8 years now and she is worth her weight in gold. I really could not run our store without her, she is amazing!! And talking of our store - look at all that wool! Over the last few months I have been filling the shop with wool, fabric, ribbons and buttons, but haven't had much time to share this with you! I promise to show you more very soon.
 Sarah thought the colours of the embroidery looked lovely against this basket of wool.
One last look at the pretty stitches.
I am so pleased that I have managed to create these designs myself. it is a long time since I've done anything really 'arty', and I am very happy that I can still do it. Now there will be no stopping me - look out for a whole series of these!

Monday, 5 December 2011

Robin Christmas Decoration Tutorial

Do you remember this little fella? I did promise you a tutorial a couple of weeks back and, for once, I am actually delivering!
My Saturday class last weekend was Hand Sewn Christmas Decorations, and I think all my students would agree that this little fat robin was the easiest one we tackled. 
So, without further ado, let's get creating!
You will need:
Brown, red and yellow felt.
Toy stuffing
small piece of ribbon
2 small black buttons
scissors, needles and matching thread.
Cut a rectangle of brown felt 5 1/2 x 2 3/4 inches. Cut a beak shaped triangle from the yellow felt.
Fold the brown felt rectangle in half and start sewing together one of the sides adjacent to the fold, as above. Use matching thread and small over-stitches.
When you are about 2 thirds along the seam place the 'beak' into the seam and continue sewing to the corner, through the beak, securing it in the seam.
Continue sewing round the corner. After about 1/2 an inch, fold the ribbon in half and place the 2 raw ends of the ribbon loop into the seam and sew through this to secure it in the seam as you did with the beak. Continue sewing to the next corner.
Now for the magic bit! Open up your remaning open end and re-fold so that the seam is on top, making your robin into a triangular shape.
Start sewing from one of your new corners till just after the centre seam.
Stop here and stuff your robin with toy filling, pushing it in to the pointy corners.
When your robin is nice and fat continue sewing the last seam closed.
Now it's time to make his red breast.
Cut a rounded end from your square of red felt.
pin this to the front of your robin and wrap the felt around his body.
Turn him upside down and pin the felt to his body.
Trim the red felt so it neatly fits around his pointy front.
Trim the felt on the robin's base so its rounded there too.
The shape you will end up with is a slightly extended semi-circle. It is basically a little cone that fits snugly on your robin.
Pin this securely around your robin's 'breast' and sew the bottom seam from the corner.
Now sew around the edge of your red breast, securing it in place to the robin.
Now it's time to give your little robin the power of sight!
Take you 2 black buttons and sew either side of his beak using black thread. You can also use beads or embroider eyes.
Now you have finished your robin, take him outside and set him free! Or keep him safe inside and hang him from your Christmas tree!

I hope you have enjoyed this little tute and have found it useful. If you make and feature this project please credit me and link back to this blog where possible.
Thank you!

Sunday, 18 September 2011

Vintage linen notebook covers

I have been busy making new projects for my Craft Workshops. Here is the latest, notebook covers made with pieces of vintage embroidered linen.
About a year ago I bought a big haul of these from a church who had been left them in a church member's will. I wrote about it in this post.
I love the idea of using up these pieces on new projects. This piece above had a small stain on it but I have embroidered over this with 'my notes', thus using up something which otherwise seemed useless. I made this cover with a lovely piece of vintage fabric I bought in an antique shop in Tetbury a couple of years ago.
The next, slightly improved version, includes new fabric from the stash Dolores sent me (that stunning Kaffe) and the green and blue leaf fabric from My Fabric House.
I used this excellent tutorial from My Patchwork Blog. Though I didn't bother with the top stitching as I didn't think mine needed it as they fit quite snuggly.

These were easy, quick and inexpensive to make. They would look just as good with more scrappy fabric instead of the embroidered linen.  Hopefully I will get a enough bookings to teach this class in October (Saturday 29th if any local peeps would like to come along!).  I can also see a lot of friends and family getting these for Christmas this year!

Monday, 4 July 2011

Wedding Blanket

I can't believe that I have been making this crochet blanket for the last 2 months and yet I haven't shared it with you at all! Just too much else going on at the moment.
I have been making this as a wedding present for my neice Sarah and her new husband Rob. You may remember that I was at Sarah's Hen Do (bachelorette party) a few weeks back when I took that trip to Liberty.
Well her wedding was on Saturday and we all had the most fabulous time! Perfect weather and a perfect setting in rural Derbyshire (not very far from Lynne Lily's Quilts). I was still finishing the blanket on the way down in the car (a familiar story for me!).
The 'Roses and Daisies' blanket is from a book called 'Crocheted throws and wraps' by Melody Griffiths. I actually made this cushion from the same pattern a year or so ago.
 
For that cushion I was very restrained and only used 2 different colourways. But for this one I really let rip and used as many colours as I could find!
Here are some of the little crocheted roses and daises before they got their white framing. I had great fun photographing these in our 'meadow'!

I tended to do lots of coloured flowers in front of the TV in the evening with my big basket of wool beside me. And then if I needed to go somewhere (like the train ride to London for the Hen Do) I could take a big bag of flowers and a couple of balls of white wall and crochet the flowers in to squares...
... and then the squares together.
There are 122 squares all together and the whole thing is finished with a crab stitch edging, which is a particularly fiddly, backward double crochet stitch, but does make a very pretty edging.
These photos of the finished blanket were taken in the lovely gardens of the B&B we were staying at for the wedding, we don't have lawn like that at Shangri La!
 
Sarah and Rob have an old caravan that they call their 'caravan of love' (in fact that was one of the songs at their wedding ceremony!) and the blanket is intended to be used in there. A few years back I made this patchwork cushion for their caravan, and I think these 2 pieces together will look so scrummy!