Pages

Showing posts with label stars. Show all posts

Sunday, 4 December 2016

Starlights Quilt


Introducing my new Thread House quilt - Starlights!  And the third finish on the blog this week!


Yes three months have (somehow) passed since our first patterns were released back in September. So it's time for three more Thread House Patterns, and this is my offering.


I was attempting something relatively simple ( I often tend to over complicate things!) but also a bit clever. It's quite a simple off-centre star block but with fancy sashing that makes another star between each block. 


Plus there's an 'Irish chain' type thing going on through each block which, I hope, gives the impression of strings of fairy lights looping through the stars.


I love a grey and yellow palette and that's what I started with, but it's a little too restrictive for me so I added the bright solids for the stars.


It's free-motion quilted with a variegated grey Aurifil 50 thread in an overall design which is a variation of a mussels pattern.


The back is one of the Heather Ross Mendicino fabrics in the colour I find most indispensable - orange!


I really wasn't sure about this quilting at first, I thought that the grey was too dark, especially over the yellow stars. But after sharing the quilt with my students and getting some encouragement I feel a bit better about it, and I have to say it looks good in the photos.


Lynne and Karen both have stunning new quilt patterns to offer and all three will be ready to buy later this week.

I'll be sharing them all here once they're published!

Thursday, 17 March 2016

Mystery Quilt Update


We are up to week 7 of my Mystery Quilt evening course tonight so I thought it was a good time to share the quilt's progress so far.

I shared the first couple of blocks in posts earlier this year and explained how offering this class back in December (when we launched the term) had given me a couple of extra months to plan a new intermediate patchwork course. This was of course completely dependent on my students having faith in my design abilities as they had nothing to go on when they booked this (luckily they trust me!)!


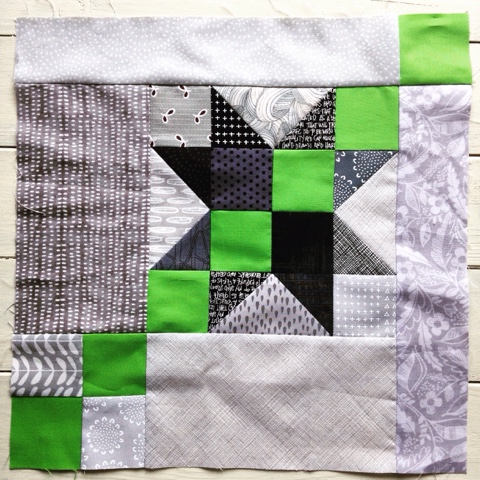
Here is a re-cap of the first 'snail's trail' block and the first block I made, top right. This ended up as block 4 as I thought students needed a bit of a 'run at it'!

So the bottom left 'shooting star' block became week 2.


And this 'sawtooth checkerboard' was number 3. Yes I have to keep coming up with names for the blocks too - not my strong point!

The idea is that we make a block in class and then at home students 're-mix' the block any way they like for their second block (giving us 16 blocks at the end). Here is my re-mix of number 3. So far the students have all amazed and impressed me with their imaginative re-mixes!


Here is my re-mix of number 4, except this is actually the original block 'storm at sea' and the first version was my remix (keep up at the back!). I have been using EQ7 for some of these blocks (the ones with FPP templates) and am finding this software really useful as I get better at it.

I have also become increasingly fascinated by this block and the way the diamond shapes give the optical illusion of curves. I have just finished a whole quilt with some of these same elements for a magazine. I can't wait to share it here but publication isn't until the end of May!


Block 5 was a mini Lone Star. Each week the blocks are getting more challenging for my class. But they are totally up for it and are rising to the challenge with no complaints!


I thought this block had limited options for re-mixing so didn't really try anything for my second one (except switching the background from light to dark). But then one of my students astounded me by rotating each of the corners 180 degrees (and making each corner have a different background) to make a totally different block!


This same student, Mags, is actually making 4 different blocks each week (for a giant quilt!) and is really shining with her different re-mixes, as are all my students. One of the most wonderful (and surprising) things about teaching is how much you constantly learn from your students!


This is block 6 and another from EQ7. They call this 'morning star' and it is all FPP and therefore quite time consuming. But I love it!

I wasn't sure how the mixed light and dark background was really going to work for the re-mixed block but actually it is my favourite block so far.


It's quite hard coming up with ideas for new blocks each week so I have talked the students into designing their own blocks for the last class.
I thought a really fun last class would be to let the students design their own blocks! I think they have acquired enough confidence and knowledge of techniques through this quite rigorous course to give it a go under my tutelage.

But that still leaves week 7 tonight. Carrying forward my 'each week more challenging than the last' mantra we are really going for it this week with a double New York Beauty type block which I adapted from an EQ7 block (there was actually even more detail in the original!) called 'Rolling Wheel'.


It is ridiculously laborious! I managed to make a quarter of the block last week to show them and I feel like it has taken me all week to finish it! And it is very far from perfect!


Poor Mags, can she really make 4 of these??!! So I am thinking I will offer an easier alternative as well. I have a block up my sleeve that I was going to use for my 'design your own block' week (yes, of course I forgot that I will need a block anyway to finish the quilt myself *sigh*).

I may also manage another easier 'curved piecing' block before the class tonight - I have a few hours to spare! Maybe this Mystery Quilt wasn't such a great idea after all...

Hopefully I will be back relatively soon with a whole finished quilt to share!

Monday, 8 December 2014

Modern Medallion - in progress


I've been planning to make this quilt for a while now. It's going to be a new 10 week evening course at myBearpaw Studio.
But of course I never leave myself enough time!


I started it a month ago and completed a large centre and a border of HSTs.


I had some positive feedback on Instagram and from my MQG buddies at show and tell last month.


Some magazine deadlines and our Silver Wedding trip to Copenhagen meant rain stopped play until last Tuesday when I knew I had just 3 days to finish it!


I had been planning another border but the last one nearly killed me and this does need to be achievable in 10 x 2 hour sessions (with homework!) so I stopped after the friendship stars. However I will be adding at least one more plain border to finish and possible a short scrappy one (I want it to be a good size).


A quick look at this quilt's journey so far as seen on IG. The middle of the centre block...


...some added 'Bearpaws', I thought it was about time I incorporated these somewhere!


Later that same day (hence bad photo)... A round of HSTs.


3 weeks later I got straight to it again with this mosaic type round featuring mini portholes in the corners.
Then a round of spool blocks. I think this is my favourite border so far, but what to do in the corners?


I plumped for a version of the cross and plus block, enlarged slightly to fit and echoing the centre.

The next round involved me making 36 of these cute Friendship Star blocks. It nearly broke me.


The worst bit is making all the decisions!! After I got all those stars on I really had no brain power left to design something new for the corners, and I was running out of time! This was last Thursday afternoon and I still needed to finish another new class sample and then go out for a meal with a gang of my students (such fun!). On the Friday I needed to load up all the new classes online and then head to the studio to set everything up for our big 2015 Workshop Launch weekend!


So I looked around at my spare blocks and found the free-hand New York Beauty I made for my class at the Stitch Gathering this year. I realised each quarter would fit perfectly! So I unpicked the 4 sections and attached them! Desperate measures and all that! I actually love the way they've added a slight rounding to the outer edges.


I'm not sure what everyone will make of this, as yet unfinished, Modern Medallion quilt top, but I know my students must like the look of it as the class is FULLY BOOKED already!!

We had a fantastic weekend and I am now enjoying a lovely rest :)

Saturday, 6 April 2013

Forth Bridge EPP lap quilt is finished!

Phew! I've finally finished something else for this first quarter of Finish-A-Long 2013!
she can quilt
That's 2 out of 4 (Felix's Xmas jumper was the other), so 50% percent is not too shabby I guess.
If anyone has visited Leanne's blog for the FAL tutorial's this week, this quilt will be familiar to you from the Hand Quilting Tute that I posted there yesterday.
Thanks to all of you who left such lovely comments and feedback over there (and here!). I'm really pleased you found it useful.
I designed this EPP pattern as part of the Travellin' PicStitch blog hop that Katy and Laura were doing to tie in with their trip to Sewing Summit last year. The idea was that you chose a holiday photo or one of a local landmark, and fed it through one of those colour separation aps and then used that as a basis for an EPP project. You can read more about how I did this here.
I chose one of my husband's photos of the Forth Rail Bridge which I can see from the top of my field, and designed an EPP pattern inspired by the famous geometry of the bridge. However some people (that live with me) have suggested that they can't really see any sign of the Forth Bridge in the finished quilt top.
So to make things a little more obvious I decided to hand quilt part of the bridge in to the wide top borders. This involved drawing it by hand on to the quilt top which was really quite tricky. Luckily I was using my new best friend, the Frixion pen by Pilot, which disappears like magic with the touch of a hot iron.
Hopefully you can see the bridge emerging in this photo below (not the easiest thing to photograph!) even though it is a bit squashed by the width of the border.
It measure 38.5" by 32", which I am hoping is the right size for a wheelchair lap quilt for my old dad (89!). He is doing really well at the moment but gets tired out walking any distance. My sister and I like to take him away for mini breaks and have a trip to Whitby planned for early June (and believe me he will still need something to protect him from the North Sea gales even at that time of year!).
I've backed it with flannel (which glows ethereally in photos!) so it should be nice and cosy for him. It's the first time I have used flannel to back a quilt. I found it very easy to hand quilt.
I used perle cotton throughout in white, except for the blue inner border which is quilted in Gutermann's cotton (for the sake of the tute!).
A few people have asked me about a pattern for this design and it is on my long list. Hopefully I will get around to it sometime this year.
As usual I am really pleased with the outcome (I don't think I've ever made a quilt that I haven't been a little in love with once it's finished, I think it's down to all the work that went in to it), but it's earned rare praise indeed from my husband who said "Now, that's a proper quilt!".
Not really sure what he means by this and what is says about all my other quilts, but I'll gladly take it!

Saturday, 19 January 2013

Ethel Owl is Famous!

Homemade With Love is a brand new magazine just out yesterday.
It's absolutely crammed with crafty projects.
But what's this on the contents page? Those owls look very familiar...
Yes it's my 2 pals Ethel and Edmund!
This is my first published project and so it's quite a thrill!
And if that wasn't enough excitement, there's a whole double page spread about me at the back!
I really wasn't expecting that!
I've had a good read through this new mag and I'm really impressed (and not just with page 18!). Not only are there lot's of great sewing/crochet/knitting ideas but there's also baking and cooking recipes, jewellery, gardening and lots of collage and photography projects too. It's going to published every 2 months and you should be able to buy this first edition in your local W H Smiths and big supermarkets now, or you can order a copy online. Here's their website for more info. And they are always looking for new projects for future editions so if any of my fellow bloggers have any tutorials they'd like to share then please get in touch with them.
In other news...
I've just had a wonderful week's holiday in Tenerife, basking under full sun with temperatures in the low twenties. Boy am I cold now!!
For my holiday crafting time I took away my mystery embroidery and my Liberty Star EPP. Here's how big it has grown now. Still a long way to go with this quilt top!
 I managed to complete 11 of these large hexagons. Here's some I made with the lovely new Liberty Tana Lawn I got from Very Berry Fabrics.
This one's my favourite, I just love that centre fabric.
It was so lovely having the time to stitch these together under a warm sun...
Back to reality now, at least we are not snowed in here!