Pages

Showing posts with label cori dantini. Show all posts

Wednesday, 11 October 2017

Stitch Gathering 2017 GOODY BAG GIVEAWAY!!!


Yes it's that time again! I have kept aside two of the amazing goody bags from this year's event to giveaway!

You can enter one giveaway here on the blog and the other on Instagram!

But let's take a closer look at what you will be winning...


1. From Immediate Media we have a copy of Love Patchwork and Quilting AND Today's Quilter!
2. A bundle of Cori Dantini 'Makers' fabrics courtesy or Blend Fabrics (4 panels!!).
3. 2  balls of Perle Cotton number 8 thread by DMC.
4. A fat quarter of Cloud 9 Fabric.
5. A fat quarter of Dear Stella Fabric.
6. A fat quarter of Sarah Campbell's 'Our Yard' fabric from Micheal Miller.
7. A half metre piece of Joel Dewberry's 'Florabelle' from Free Spirit Fabric.
8. A 30cm (WOF) piece of 'Down by the River' from Lewis and Irene fabric.
9. A fab little Liberty Tana Lawn Scrap Pack from Duck Egg Threads.
10. A 30cm (WOF) piece of fabric from Dashwood Studio
11. A set of spools of all types of Aurifil thread - 7 different threads including 80wt!! Also booklets and shades cards and a cool Aurifil sticker for your sewing machine!
12. A packets of delicious Nairn's Oatcakes.
13. An Aurifil Tote Bag (not pictured).
14. A mini sewing kit from the Sewing Quarter.
15. A chalk lolly courtesy of myBearpaw :)

WOW! What a haul!

A huge thank you to all our Sponsors, both for the goody bags and for the Lucky Dip prizes. We are all so grateful for your support!!


So how do you win all this booty?

Simply leave a comment on this post:
I'd like to know, if you could have your dream teacher, from anywhere around the world come to teach at the Stitch Gathering in 2018 who would you choose?! If you can't think of anything just say hello :) Make sure you leave your email address if you are a 'no-reply' commenter.

That's all you need to do! If you want to increase your chances then head over to Instagram @mybearpaw and enter the giveaway there for the second bag too.

Giveaway will close Tuesday 17th October at midnight. International entries are welcome!
Good luck!

Friday, 5 February 2016

Porthole Pirates Quilt


This was a lovely fun quilt to make with the most adorable fabric. It's my third quilt for Today's Quilter, in issue 6 which is out now. And I really enjoyed making a quilt for a child for a change.


I love that cover quilt by TQ regular's Pam and Nicky Lintott. 

And the eagle eyed among you will have spotted Sheila's Mega Pinnie on there too! Jen, the TQ editor, saw Sheila teaching this at the Stitch Gathering and knew it would be perfect for Today's Quilter.


But back to the Porthole Pirate's quilt. I finished this in December and so it was very hard for me to get any decent photos of the finished quilt (damn these northern winters!), but I knew I could rely on the magazine team to get some gorgeous styled shots like the one above.


The inspiration for this quilt came when those lovely folks at Blend Fabrics sent me the whole range of Cori Dantini's The Adventurers to make something with. Regular readers will know that I am a HUGE fan of Cori's designs, and so are most of my customers. But somehow I had missed ordering this one for the shop (her new line Little Red will be arriving any day though!).


As soon as I saw these fabulous boy illustrations I imagined some sort of porthole to feature them, so the idea here is that they look like treasured photos in wooden frames laid all over a jolly patchwork quilt!


I learnt how to make portholes from Lucie Summers at a class at the first Fat Quarterly Retreat (can that really be 4 years ago?!!) and have used and taught them many times since. They are a handy and neat technique for reverse applique.


My sewing machine was playing up a bit and skipping stitches when I FMQ'd (it's just come back from a service so that will hopefully be sorted now) so I didn't want to risk anything too ambitious for the quilting. I used a large stipple all over the patchwork background then added hand quilting to pick out details in the frames (using DMC perle cotton 8).


I also made 2 extra mini blocks that the magazine framed to make these really cute pictures. 

And Today's Quilter have very kindly made these a FREE project on their website! You can download this project free of charge on here! 


I think this little guy riding a polar bear is my favourite drawing of all (it reminds me of Philip Pullman's Northern Lights!). 


A huge thank you to Cori for designing such beautiful and inspiring fabric!

Tuesday, 17 February 2015

QuiltCon Prep with The Makers!


So I think you all know by now that I AM GOING TO QUILTCON!!!

This is probably one of the most exciting things I have ever done (is that a bit sad?!) and I am on my way to Austin TOMORROW!!

I have a lot of workshops booked and have to take a large amount of fabric and supplies so I decided to make a couple of bags to help with transportation and organisation.


This coincided with the new Cori Dantini fabric arriving at the shop, which is just perfect for this project. The Makers is all about, sewing, embroidering and knitting as well as gorgeous prints, and is the latest line from Blend Fabrics by one of my favourite fabric designers.

First I made this large Workshop Bag. In a free and easy manner I cut up strips and used these to frame the beautiful panels. I made 2 bag front and quilted them with a daigonal grid. Plus I made that nifty inset zip pocket for cutters and scissors.


I made the bag big enough to take an 18 x 24 inch cutting mat, it sits snuggly against one side with a strap that buttons on the outside to hold it (and big square rulers) in place. Long rulers can sit at the bottom for extra stability.


Then you can fill up the bag with your fabric! It's lined with one of Cori's fabrics from Hello World.

I then made a tote bag for carrying around when I am not attending workshops, and for keeping purse, phone, magazines etc in.


On one side are more of the crafty lady panels, and the other side is made from an old pair of jeans. Why denim, I hear you ask? Well I will be partaking in the QuiltCon Pin Swap which means I will be obtaining a lot of pins (or badges as we like to call them in the UK) and somehow denim seems to me the most appropriate material to display these on!


Inside the bag is a little pocket for my new business cards and a special 'pin pocket' so that I always have a pin ready for swapping at all times!


I took me a while to work out what the 'pin swap' was all about. When I eventually cottoned on to the fact that folks were having their own badges printed to swap at the event I knew I had to join in!

So I ordered 200 myBearpaw badges!! It just sounds like such a great way to meet as many new quilty friends as possible. So when I get back I hope to show you a totally full up denim bag side!


Here are my new business cards - myBearpaw one side and the Stitch Gathering the other.


And last but not least a matching lanyard for my official QuiltCon badge! I've just remembered that you are supposed to display a badge on your lanyard so folks know you are part of the pin swap! Better go and do that!


If you like the look of my QuiltCon accessories then you can make your own 'Makers' bags!
We have 10 designs in the new line for sale in our Edinburgh store and on our website (fat quarters and yardage) plus this FQ or F1/8th bundle. Check them out here.


So I will see you on the other side with tales of my trip to Austin, unless you are going to QuiltCon too in which case I will see you there!!!!

Monday, 29 December 2014

It's been a very pouchy Christmas!


Pouchy for presents that is!
I've come to the zippy pouch very late in the day, having let my colleague Naomi teach our class in this subject in the past.

But armed with this excellent tutorial from Flossie Teacakes  I turned this hexy sample piece (that I made during my demos at the recent ICHF show) into a sweet Secret Santa gift for one of my EMQG pals (it's ok she already knows who made it!).


After that first attempt (I had to adapt the tutorial a little as the hexies were already in one piece) I wanted to try another one. So I made a couple of scrappy improv blocks, added some wadding and FMQ'd them.


Then made them into a nifty little pouch for my niece. I filled it with fabric and haberdashery as she is a keen sewer too.


For the lining I used this adorable dress pattern fabric from Riley Blake.


Now I was thoroughly addicted and decided to make one more!
I was also enjoying 'using stuff up'. These petal/leaf shapes are the left-over bits from using one of the Sizzix Drunkards Path dies (for my Squaring the Circle Quilt). They were such a perfect shape I couldn't throw them away.


So I needle-turn appliqued them to black Essex Yarn-dyed linen in a random pattern.


After some hand quilting I turned them into another pouch, this one for my best friend, also filled with fabric and habby (all my friends and family are forced to be crafty).


Next I turned to my spare sample embroideries made for my Further Adventures in Embroidery class.
I 'portholed' them both and turned one into a notebook holder for my sister-in-law, with the aid of some lovely AMH Honor Roll (and a cute Red Riding Hood button!).


And another into a draw string bag for my mother-in-law.


It's fully lined with this gorgeous Heather Bailey 'Up Parasol' fabric.


Lastly I made Christmas Tote Bags for my 3 helpmates - Barbara, Jane and Sarah. I don't know where I would be without them, and even though Sarah has moved on to other things now she will always be an honorary helpmate.


I also really wanted to make something with these Cori Dantini Christmas panels from her Merry Stitches line by Blend Fabrics. Each bag has a different panel on each side - house, santa or snowman.


I also embroidered little felt holly labels (compete with button berries!) for the inside. They are all lined with this Dashwood Studio fabric.


It was lovely to have enough time to make some handmade Christmas presents this year.
I finally seem to have 'caught-up' after a frantic year. In fact I'm feeling thoroughly rested and relaxed at the moment!
I hope you are too :)

Monday, 10 November 2014

Countdown to Christmas!


Proper thinking about Christmas is still a few weeks away for me, but we've already started some of our Christmas workshops at myBearpaw studio.
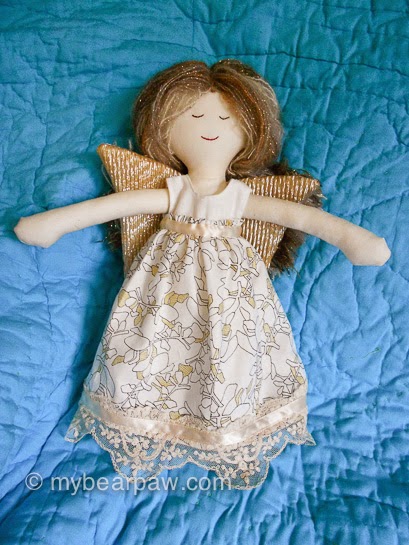
Yesterday we did Christmas Angels and had a lovely day creating pretty handmade 'dollies with wings'.
Here is the angel I made along with the rest of the class. Her name is Dolores (after one of my best blogging buddies). I think she looks pretty sophisticated with her 'Botanics' dress trimmed with vintage lace, and her amazing hair!


Here's her hair from the back. I used Sirdar 'Hush', a lace weight yarn with glittery bits that is so soft and fine. It worked really well as hair, especially as it looks a little like she has highlights!


And here are all her angel pals!
From left we have the brunette angel I still had from last year (I sold the other two but am so pleased I held on to one so I had a class sample ready!), Emma's blonde beauty, Sarah's (my old colleague and bestie who came back to the studio for a day - so lovely to see her!) hippy chick, Dolores, Wendy's 'pretty in pink' and lastly Eva's very demure grey haired angel (not quite finished but very nearly).
I love how different they all are. What fun we had while making them and bringing them to life!!


The other Christmas class I have going on is a 5 week evening course to make this Advent Calendar Quilt. This is version number 2 (number 1 discussed here), of my Advent Tree Quilt. I made this one for the Blend Fabrics booth at Quilt Market, it's all made with Cori Dantini's Merry Stitches. I wonder if any readers saw it there?


Hopefully I will get a pattern produced for this next year (one of my New Year resolutions is to concentrate on producing patterns from some of my workshop projects).


The numbers on version 2 are executed differently from the earlier version, above. My class are working on the first version (and doing so well, they are actually ahead and are going to finish too soon if I'm not careful!) but I think version 2 would be easier for a pattern.


As for my own Christmas present making, that isn't even on my radar yet. I am way too busy planning new classes for 2015, which get announced early December!

Tuesday, 12 August 2014

Easy Tote Bag Tutorial


For a while now I've had this gorgeous 'Made for Adventure' panel of Cori Dantini's (from her The Sweet Life collection) and have been meaning to do something with it.

Recently we put our remaining stock of these panels in our summer sale and I decided it would be a good time to finally make something, and so I made this very simple tote bag. And luckily I remembered to take some photos while I was doing it so I could share this tutorial with you.


You will need:
1 Made for Adventure Panel or 2 pieces 14 x 17 inches each for bag fronts, and 2 strips 2.25 x 22 inches for straps.
2 x FQ for lining or 1 half metre piece (I was using stuff up so used 2 FQs).

I chose 2 of the lovely ladies for this tote bag. I cut the third lady off first and she went on the back of my Stitch Gathering Ticket bag!. 

First of all trim 2 strips from the bottom of the panel (with remaining 2 ladies), each measuring 2.25 x 22 inches. Set these aside for straps.
With the remainder cut 2 pieces 14 x 17 inches each.


From each of your 2 FQ trim away a 2.25 inch strip from your long side (so it will be approx. 22 inches long), or cut 1 WOF strip from your half metre and cut in to 2 strips. Set aside
From the remainder cut 2 pieces exactly the same size as your bag fronts.


With right sides together sew round 3 sides of your bag fronts, leaving the top edges open and using a quarter inch seam.
Repeat with your lining pieces.


Snip bottom corners.


Turn your bag front inside out and press.
Don't turn your lining inside out. Place it inside the bag front and poke down into the corners for a snug fit.


Turn under a half inch seam at the top of the bag front and the lining so that they line up. Press.


Now take one of your main fabric strap pieces and one of your lining fabric strap pieces and, with RST, sew together along one of the lengths. Press seams open.


Fold in half with WST and press.


Open up again and turn and press under a quarter inch seam to the wrong side on both sides of the strap.


Fold back in half so turned under edges line up. Pin.


Topstitch a straight seam to sew this side of the strap together then sew a matching topstitched seam along the other side of the strap.


Repeat with the other strap prieces 2 give you 2 finished straps. Your straps may have a slight bow in them, this is a good thing!


Take one of the straps and place the raw edge of one end in to the turned under seam of your bag about 2.5 inches from the corner. Pin in place.


Place the other end of this strap about 2.5 inches from the other corner and pin in place. Use the slight bow to your advantage here by placing the straps in the direction of the natural curve.


Turn your bag over and do the same with the other strap. Make sure both your straps are the same size before pinning down.


Now top stitch a straight seam close to the edge of the top of your bag from the front. This will secure your straps and finish your top edge at the same time. Don't sew through the other side of the bag when you are doing this!


And that's it - you're finished!
I reckon these take about half an hour and look really special made with lovely fabric. And you can make them to any size you like so a great way to use up larger pieces of fabric that you can't bear to cut up.


Now as I said, I had these panels in the sale back in July, but it's taken me so long to post this tutorial *humming, looking around the room* that the sale has finished on the website. BUT I do have a handful of panels left in the shop for £6, and you could buy one of these by coming to our Edinburgh shop, OR by phoning the shop (0131 228 6377) on Friday or Saturday and buying one over the phone which we will send to you for a small fee :)
They are on our website here, but for £8.99 (happy for you to pay this for them if you like!).
This bag would also work so well made with one of our new A Wonderful Time panels. Buy 2 panels and get 3 bags! Or just use the panels for the front with a plain back and get 3 bags out of 1 panel!!


I hope you have enjoyed this 'Tote Tute'! Happy bag making!!