Pages

Showing posts with label cot quilts. Show all posts

Monday, 17 April 2017

Butterfly Block Tutorial


It's time for a new tutorial!

How would you like to make a pretty butterfly block that's quick and easy and requires NO foundation paper piecing?! That's right no FPP! It's not that I have anything against FPP but sometimes you want to just rotary cut and sew!


I've been playing with the gorgeous new Kaffe Fassett Spring Collective fabric from Free Spirit and I came up with this block that uses the snowball technique to make a butterfly. 


This is what you need -

Background fabric: (I used a white solid)
ten squares measuring " each
two squares measuring 2" each
two strips measuring " x 4"
two strips measuring 2" x 3½"
one strip measuring 1" x "
one strip measuring 1" x 2"
two strips measuring 2" x 10"

Butterfly fabric:
two squares measuring 3½" and two squares measuring 4" from two different prints
one strip for the body measuring 1" x 4½" (I used a charcoal solid)

You'll also need a pencil or pen, a ruler, a rotary cutter and mat, and of course some Aurifil 50wt thread for piecing.

First of all draw a diagonal line, corner to corner, on the back of all your background " and 2" squares.


Pin a 1½" background square to three of the corners of one of the 3½" butterfly squares, RST, and so that your drawn line cuts across the corner. 


Sew along this line on each  background square.


Trim the outer corners leaving a ¼" seam. You should probably use a ruler but I like to cut freehand with my rotary cutter 😉.


Press then repeat with the other 3½" square and three more 1½" background squares.


Repeat using a 4" butterfly square, two 1½" background squares and one of the 2" background squares. Make two of these.


It's best if you lay them out before you sew them so you can get the triangles in the right corners. That photo above should actually be upside down, but anyway the 4" squares need the 2" triangles to mirror each other.


Next sew the 1½" x 4" background strip on the outer sides of the 4" butterfly blocks and  2" x 3½" strips on the outer sides of the 3½" butterfly blocks.


Sew the two sizes of butterfly wing blocks together (so they mirror each other still). Sew the 1" x 1½" background strip to one end of the body strip and the 1" x 2" background strip to the other end of the body strip.


Sew the body strip between the two wing halves. Then finally sew the 2" x 10" background strips to the top and bottom.


Ta dah!

So that is one butterfly block, but I decided I wanted to make nine blocks and use them for a cot quilt.

To save time I cut a 4½" x 9½"" butterfly body strip and sewed a 1½" x 9½"" background strip to one long side and a 2" x 9½"" background strip to the other. Then I trimmed 1" strips from this to use for the body.


Then I didn't actually sew the 2" background strips to the top and bottom, but instead pieced them in rows which I then staggered and added extra background to before sewing together. I pieced a single butterfly within a wide strip of background and sewed this to the bottom.
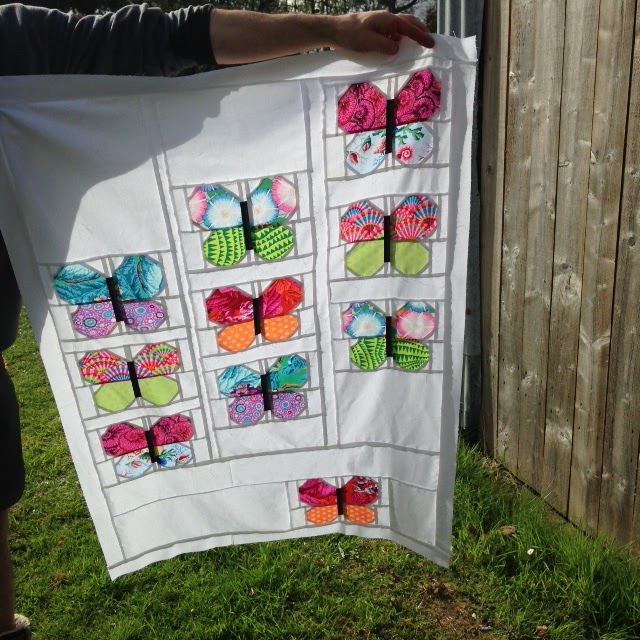

Here is the finished quilt!

I wanted to give the effect of a swarm of butterflies lifting off from a bush when disturbed. I also thought that the richly coloured fabrics would look so good against an expanse of white negative space.


It measure 33" x 46" (83 x 118cm), which could be a large cot quilt or even a lap quilt.


This is actually the first quilt I have finished this year so I gave it the full Shangri la Farm photo shoot treatment!


The back is an Amy Butler fabric. There wasn't quite enough so I added a strip of Tula Pink 'Eden'.


I quilted it with a loosely flowing feather and spiral pattern using the same #2000 Aurifil 50wt thread that I had pieced it with. I wanted to keep the purity of the white background and for the quilting to be dense and textural.


The quilt has been washed and tumble dried to give it this lovely crinkly texture (however you can't see the quilting so well now!).


I used another of the Kaffe Fassett Spring Collective fabrics for the border, this one is 'shark's teeth' by Brandon Mably and I think it's perfect for a binding.


These sumptuous, jewel coloured fabrics work so well as butterflies. I have another quilt planned with them soon, and I have enjoyed using them so much (they feel as beautiful as they look!) that I am planning to order some for our store.

Plus check out the Free Spirit blog for news on a new Kaffe e-book available now!


I hope you get a chance to try out your own version of the butterfly block using this tutorial. Please make sure to play nice and always credit me and link back to this post if possible.

Plus I'd love to see them so tag me on social media too please!

Thursday, 5 May 2016

Tell Me A Story Quilt


Somehow I've accidentally made this cot quilt! I only intended to make a block or two of these super fun 'tell me a story' blocks from Amy Friend's new book, but I got a bit carried away and made a whole quilt!

But I bet that's happened to everyone at same stage, hasn't it?!


Amy, who blogs at During Quiet Time, has organised this fun giveaway to celebrate the publication of her excellent new book Intentional Piecing.


Once you get hold of a copy of the book you can make one of these cute blocks. The book is all about fussy cutting and finding that perfect piece of fabric (as well as amazing paper pieced patterns and great projects!) so this block perfectly encapsulates the fun you will have with this book.

The idea is to let your fabric choices 'tell a story'. Like this farmer loading his hay wagon! This is from a gorgeous new fabric by Darlene Zimmerman called 'Morningside Farm'. We have it in the Edinburgh shop but I have been too busy to list it online - sorry folks!


If you use the hashtag #tellmeastoryquilt your block will be entered for a giveaway and 2 lucky winners will be chosen at random on June the 1st (so still plenty of time to enter!) to win this amazing bundle of fussy-cut-able fabrics from Sew Me A Song. Each block equals another entry and you can make as many as you like!


I enjoyed making the first block so much that I made another. Then I remembered that my neighbour was having a baby - imminently!


And I knew these blocks would make a fabulous i-spy quilt, so I kept raiding my stash for more fun fussy-cuts, like the Cotton and Steel tiger here!


And this Cori Dantini cat from The Makers line. My neighbours have a ginger cat so I've used a couple (see below).


I sacrificed more than one precious Heather Ross gnome to make this block (I must really like my neighbours!).


Taking the story telling literally here with this 'incy wincy spider' fabric.


A happy hot-air balloon!


A little more Heather Ross and another ginger cat!

Then all of a sudden I had 12 blocks! I decided to sash them with this Architextures fabric to make it a little bigger...


...then I used one of my favourite FMQ patterns, the double loop, to quilt it in a super quick time. This will give a lovely crinkle when I wash it!


I chose this Robert Kaufman flannel for a cosy backing (oops my Croc got in a few of these shots!) and bound it in a red and white Spot On fabric.

And viola! A fun and fast cot quilt!


You can get a 30% discount off Amy's book from the Lucky Spool web site using the discount code FRIEND30.

There are some wonderful projects in this book and I would thoroughly recommend it. I may even have found the perfect quilt to make for my husband one day as he particularly loves one of them!


If you get hold of a copy and decide to make a Tell Me a Story block then don't forget to post on Instagram and use the hashtags #intentionalpiecingbook and #TellMeAStoryQuilt to be in with a chance of winning that fab prize!

Wednesday, 12 June 2013

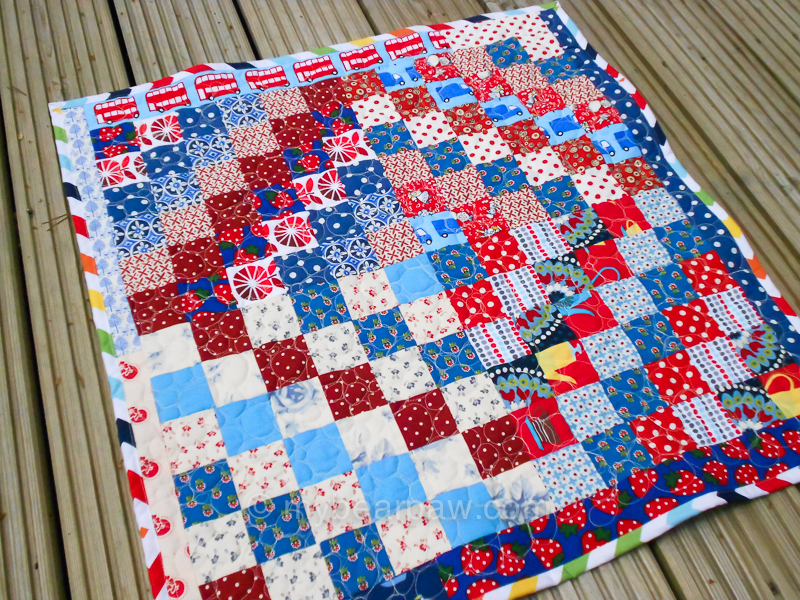
Little Scrappy Trip Quilt

I am at home all week working on new Bearpaw craft classes for the Autumn which will get announced in a week or so (no pressure then!).
Phew, being creative all day is really hard work! And stressful! I'll be glad to get back to the shop.
So there will be lots to show you soon, but meanwhile, for a little break from the coal face, I made this little cot quilt.
Amazingly, one of my son's best friends has had a baby! That means I could almost be a granny myself - yikes!
One of the classes I am working on this week is a new intermediate patchwork evening class. This means I can use up the samples from my Modern Patchwork Techniques 1 and 2.
The first class in MPT1 was Scrappy Trip Around the World. It's really caught on this year but I came across it a few years back after seeing it used in a Do Good Stitches Bee quilt.
I had 4 blocks already, so I sewed these together and used some left over strips for a border.
As I am at home it means I can't pop in to the shop (a half hour drive away) for supplies. So this is very much a 'use things up' project. I even pieced the wadding together from scraps.
I thought I would try my hand at some new FMQ stitching with this circle or bubble pattern.
I wasn't really sure how to achieve this affect and the whole time I was doing it I thought it was going to look awful. But actually it looks great!
And luckily Stuart has had a baby boy, as I think this wouldn't have worked quite as well for a girl. I don't know what the little ones name is and can't ask my son as he is away meditating for 10 days in Herefordshire *sigh*.
I used a Riley Blake chevron for the binding and the whole thing took me only a couple hours (but I had the blocks pieced already).
It's such a relief to get something finished!
Expect to here quite a lot from me over the next few weeks as lots of half finished projects reach fruition.

Friday, 30 December 2011

A hearty Goodbye to 2011...

... and Hello to 2012! I am just hoping it will be an improvement on 2011 which was a pretty pants year as far as I was concerned, but it did have lots of good points too.
And look at all the quilts I managed to actually finish! I am very impressed with myself. Of course most of them are tiny doll quilts, and some of them involved glue, but there are 12!
I do like making mosaics, so I made one of non-quilting stuff too - bags, cushions, an owl (of course), and a surprising amount of dollies! I think that crocheted 'Roses and Daises' blanket is my favourite project out of everything I made this year.
Just room for one more mosaic, this time looking forward. This is an Inspiration Mosaic for the first Flickr activity I have signed up for in 2012. I just sneaked in as they were shouting 'Last Call' on the ORBC 'Around the Bend and Across the Pond' Round Robin. This is an offshoot of the main Old Red Barn Co Quilt Along group, where 4 different groups are taking part in different versions of a Round Robin. I am in the 'round' group where we each make a middle and send it to the next person who makes the next row and then sends it on. At the end we each get sent a completed quilt top, AND it will be a surprise (somehow). There are 'row' groups and 'free form' groups. I am super excited about this and so was the first to get my mosaic made.
It's great to have happy stuff planned already for the New Year. What about you lot out there? What's your next project/swap/bee?
I hope you all have happy stuff to look forward to as well and A Happy New Year to you all!

Monday, 31 October 2011

Trip around the pumpkins

Here's a Trip Around The World cot quilt I just finished to sell in the shop. I used this tutorial from Quiltville and it was very quick and easy. Melanie of Texas Freckles is doing this design for one of the other 'Do Good Stitches' circles this month and recommended this tute. I like checking out what all the other circles are doing - great inspiration!
h1/08/broken-dishes-qal-part-2-tutorial.html
The solids are all Moda Bella shades that I have for sale in the shop and some of the prints are from the Cabbages and Roses and Hometown FQ packs that I bought for the shop a few months back (they have nearly all sold now, well they've disappeared somehow *ahem*).
This is obviously aimed at a little girl, though hopefully not too pink. I have also started one in reds and blues for a boy.
I'm not sure how well the design works on a rectangle but it's still a nice overall patchwork effect.
It's pretty simple and I just machine quilted in lines. Even so it's still quite a bit of work and I will have to make to more expensive than the tickertape cot quilts I have made recently. So we will need to see if I can get enough for these to make it worth my while!
And what about the pumpkins?
Well when I was taking photos of the quilt outside this afternoon I couldn't help admiring the lovely pumpkins grown by my DH, here at Shangri La Farm, and artfully displayed by him on our front steps!
Happy Halloween everyone!

I am linking up to Pieceful Life's Little Quilt Monday!